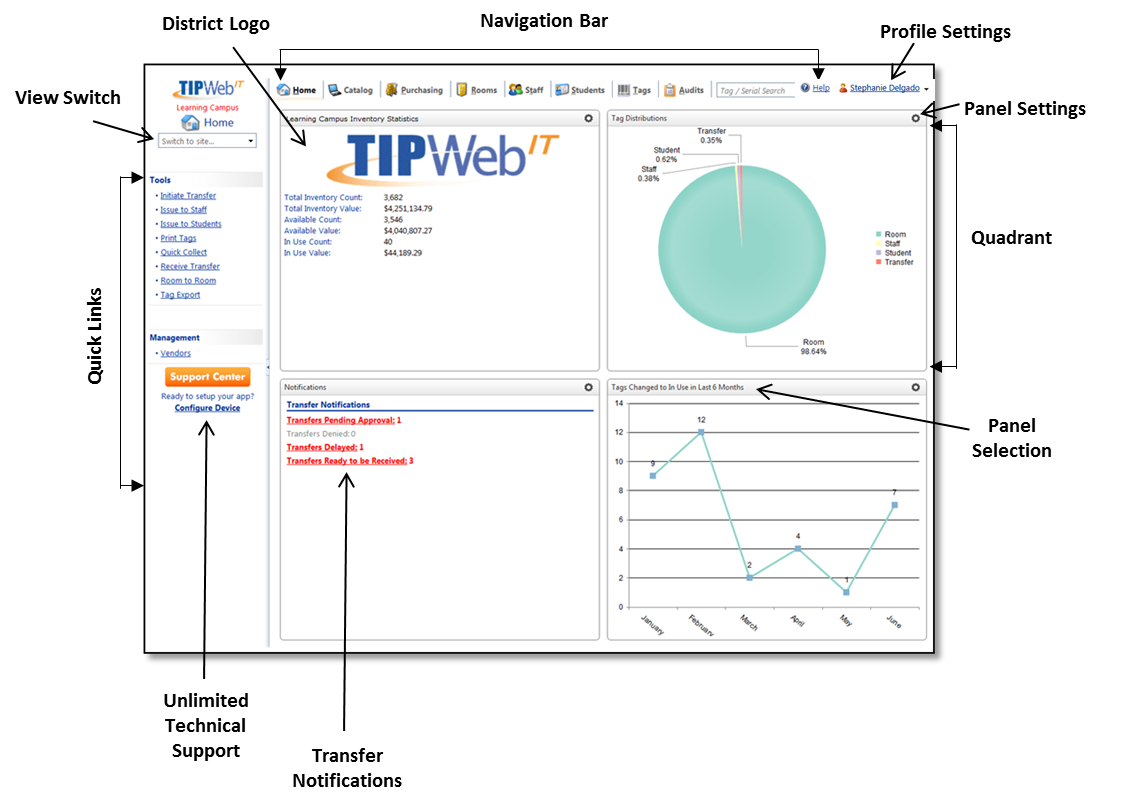
Home provides immediate functionality (after logging in to TIPWeb-IT) through various alerts, clickable links, in application notifications, and site wide information.
Tools:
· Initiate Transfer - allows items to be moved from one site to another site through the process called Site to Site Transfers.
· Issue to Staff - allows a site to issue an item to a staff member, in the status of "In Use."
· Issue to Students - allows a site to issue an item to a student, in the status of In Use.
· Print Tags - allows a site to print tag labels to affix to items they wish to track.
· Quick Collect - allows a site to collect items with the status of In Use to a room or transfer of their choosing.
· Receive Transfer - allows items to be moved from one site to another site through the process called Site to Site Transfers.
· Room to Room - allows items to be moved from one room to another room within a site through the process called Room to Room Transfers.
· Tag Export – allows a site to compile a report showing the complete listing of the tags within TIPWeb-IT respective to site and/or administrative views.
Management:
· Vendors - individuals and/or companies who provide goods or services to your district (similar to a supplier).
View dependent on access given by Administrative Administrator.
Home ![]() -
displays district provided logo, campus view impersonating switch, clickable
alerts, active in application notifications, district wide inventory statistics,
customer support contact information, and the TIPWeb-IT Support Center.
-
displays district provided logo, campus view impersonating switch, clickable
alerts, active in application notifications, district wide inventory statistics,
customer support contact information, and the TIPWeb-IT Support Center.
Catalog![]() - allows
view of product details located on a site and the respective location
information.
- allows
view of product details located on a site and the respective location
information.
Purchasing ![]() - allows
a site level administrator to create purchase
orders. All users to receive, and assign items to rooms while simultaneously
recording essential purchasing data (purchase
order number, purchase date, vendor,
funding source, and quantity).
- allows
a site level administrator to create purchase
orders. All users to receive, and assign items to rooms while simultaneously
recording essential purchasing data (purchase
order number, purchase date, vendor,
funding source, and quantity).
Rooms ![]() - the
locations to which you will issue and account for items within your district.
- the
locations to which you will issue and account for items within your district.
Staff ![]() -
allows a site level administrator to
add a staff member’s details and track inventory assigned to them.
-
allows a site level administrator to
add a staff member’s details and track inventory assigned to them.
Students
![]() -
allows a site level administrator to
add a student’s details and track inventory assigned to them.
-
allows a site level administrator to
add a student’s details and track inventory assigned to them.
Tags ![]() - capability
to search, view, and/or print tags respective to a site. This is
an on-screen way to access the data also located in the Tag Export.
- capability
to search, view, and/or print tags respective to a site. This is
an on-screen way to access the data also located in the Tag Export.
Audits ![]() - provides
the ability to initiate, view the progress, and reconcile tag audit states.
- provides
the ability to initiate, view the progress, and reconcile tag audit states.
Quick
Search ![]() - allows a user to quickly
search for a specific Tag, Serial number, Student or Staff member.
- allows a user to quickly
search for a specific Tag, Serial number, Student or Staff member.
Help ![]() - displays
the online TIPWeb-IT Help System (context-sensitive to the TIPWeb-IT page)
and opens in another browser window.
- displays
the online TIPWeb-IT Help System (context-sensitive to the TIPWeb-IT page)
and opens in another browser window.
User
![]() -
the person currently logged into the TIPWeb-IT system.
-
the person currently logged into the TIPWeb-IT system.
Panel
Settings ![]() - option for users
to customize dashboard panel view including statistics, notifications,
and/or alerts.
- option for users
to customize dashboard panel view including statistics, notifications,
and/or alerts.
· District Logo - displays a district provided jpg or gif image (400 pixels wide by 100 pixels tall) on all TIPWeb-IT user's home screen - admin view and site view.
· District Name - displays the assigned district name as identified in TIPWeb Settings.
· Impersonating
Switch ![]() - a
drop down menu to switch the current screen to the selected campus'
view of TIPWeb-IT.
- a
drop down menu to switch the current screen to the selected campus'
view of TIPWeb-IT.
· None – quadrant is left blank.
· Inventory Statistics – shows count and monetary value of inventory (total, available and in use).
· Notifications – shows transfers needing action by a user.
· Outbound Transfers Pending Approval – lists transfers pending approval and shows an indicator .of how far along the transfer is within the approval process.
· Purchasing: Outstanding Tags to Receive – shows amount of tags still needing to be received on a purchase order (across the district or at an individual site)
· Staff Status – shows staff members with/without assigned inventory and location.
· Tag Distributions – shows the breakdown of assigned tags by percentage/number.
· Tag Status Change Over Time – shows the trend of tags, according to selected status, over a period of time.
· Tag Status Breakdown (Rooms) – shows status of all tags allotted to a room.
When selecting the Tag Status Change Over Time there are two additional pieces of information to enter: Select the Status: the tag status you would like displayed in the panel and Date Range: the range of time you would like displayed in the panel.
Items in panel charts are interactive and can be toggled on and off. Click any active item in the key to turn it off. Click any inactive item in the key to turn it on.
The user has the ability to choose which panel appears in which quadrant of the dashboard. The user’s customized preferences are applied to any site to which they have permission.
Dashboard preferences may be different at the administrative and site level.