When approval restrictions are set for transfers, a notification appears under Transfer Notifications in the Notifications panel on the Home Page Dashboard.
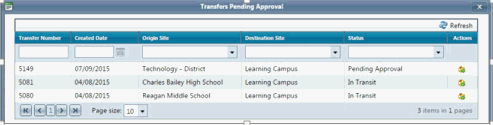
Transfers that show Pending Approval status need approval prior to shipping to destination site.
1. Click the Transfers Pending Approval link. The Transfers Pending Approval window opens.
2. Click the
 Action icon for the line
item Pending Approval. The Receive Transfer window opens.
Action icon for the line
item Pending Approval. The Receive Transfer window opens.
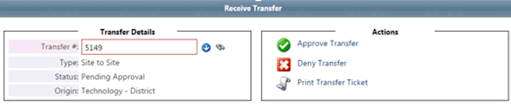
3. Click
![]() . The Transfer Approved message
opens.
. The Transfer Approved message
opens.
Transfers can also be denied from this screen.
4. Click OK. The Receive Transfer window re-opens.
5. Close window. The screen refreshes and the Notifications panel updates.
When approval restrictions are set for transfers, a notification appears under Transfer Notifications in the Notifications panel on the Home Page Dashboard.
Transfers that show In Transit status need approval prior to being received at destination site.
1. Click the Transfers Pending Approval link. The Transfers Pending Approval window opens.
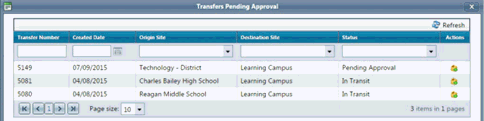
2. Click the Action
icon for the line item In Transit. The Receive Transfer window opens.
3. Click
![]() . The screen refreshes.
. The screen refreshes.
If receiving a tagged item, proceed to Step 4.
If approving an untagged item, click
![]() . The screen refreshes and the box
under Complete is now checked. No further action is needed to receive
these items.
. The screen refreshes and the box
under Complete is now checked. No further action is needed to receive
these items.
4. Click OK. The Receive Transfer window re-opens.
5. Under Received Tagged Inventory, select Room, Status, and Tag from drop down menus.
To keep the tag status the same as when it originated, check Use Previous Tag Status box.
6. Click the ![]() Save
icon. The screen refreshes and the status now shows Complete.
Save
icon. The screen refreshes and the status now shows Complete.
7. Close the window. The screen refreshes and the Notifications panel updates.
When approval restrictions are set for transfers, a notification appears under Transfer Notifications in the Notifications panel on the Home Page Dashboard.
Transfers that show Denied have been declined at the destination site and need to be deleted or revised and resubmitted.
1. Click the Transfers Denied link. The Transfers Denied window opens.

2. Click the
Action
icon under Actions for the denied transfer. The Initiate Transfer window
opens.
3. Perform one of the following actions:
To
delete a single item, click the ![]() delete icon for that
line item. To delete an entire transfer, click
delete icon for that
line item. To delete an entire transfer, click ![]() in
the upper-right Actions area.
in
the upper-right Actions area.
Add or remove
needed items. Click ![]() in the upper-right Actions area.
in the upper-right Actions area.
4. Close window. The screen refreshes and the Notifications panel updates.
The administrator can select a setting that automatically generates an e-mail notification be sent when a transfer needs approval by the recipient. The recipient can then click a link in the e-mail that goes directly to the approval screen. Once there, the recipient can approve or deny the transfer.
The administrator can select a setting that prompts the application to automatically send an e-mail notification when a transfer needs approval by the recipient. The recipient can click a link in the e-mail that goes directly to the approval screen. This allows the recipient to approve or deny the transfer without logging into TIPWeb-IT.
1. In the Transfer Pending Approval e-mail, locate the sentence reading, “To approve or deny this transfer, click here.”
2. Click click here. The Transfer Approval tab opens.
3. To approve
the transfer, click Approve Transfer
![]() . The Approve Transfer window opens.
. The Approve Transfer window opens.
4. When prompted, enter your Name: and Title: in the appropriate fields.
5. Click
![]() .
.
Transfers can be denied by clicking the link in the e-mail notification, as well. On the Transfer Approval screen, click Deny Transfer.
The Deny Transfer window opens. Fill in the Name: and Title: if prompted.
Click ![]() .
.
Transfer Notes communicating specific details about a transfer can be added when initiating a transfer. They can be edited in various stages of the transfer: while the transfer is in the status of New, Pending Approval or Submitted (for Site to Site Transfers or Site to Warehouse Transfers); and while the transfer is in the status of New, Pending Approval, Submitted, Delayed or Scheduled (for Warehouse to Site Transfers).
Transfer Notes will display user name of note creator, time and date created. ONLY the note creator can edit or delete a note they have posted.